Wednesday, October 31, 2012

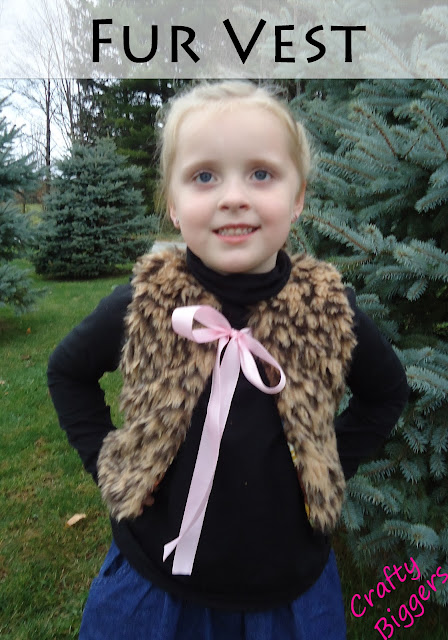
Whimsy Couture Fur Vest - Pattern Review

I'm really loving vests lately. Especially for my girls. When I saw this Fur Vest was out for pattern testing I jumped at the chance to try it out. I had never worked with Faux Fur before and aside from a little big of mess left behind, it wasn't as difficult as I thought it would be. 


Maddie has originally picked out this cheetah fur last year for her halloween costume, but last minute she changed her mind and wanted to be a lion instead so I had about a yard or so of the cheetah print Faux Fur laying around waiting to be used.


Since the lining doesn't really get seen I let Maddie have her choice of fabrics and she want with this adorable bird/earth day fabric that we picked up from the remnants bin at Joann's. Anyone else love sifting through the remnants when they throw up their 50% off sign? I often pick up bits of fabric that I probably never would have chosed before.

Are you into the Faux Fur look that has been popping up this Fall/Winter?

Monday, October 29, 2012

Seamingly Smitten Little Lady Jacket - Pattern Review

I recently did my first pattern review for Seamingly Smitten. I have sewn a pattern by Seamingly Smitten in the past and loved that one as well. This pattern is called the Little Lady Jacket. I sewed it for my little lady and she loves it. That may be because she picked out the fabrics all by herself. She's my little fastionista in training.


The jacket is a thin stretch corduroy with a cotton lining. This was my first time using a button cover kit and I'm not sure why I waited so long. It is so easy and makes for such a finished look.

The collar has a slight ruffle and can be worn up or down.

Pink and Teal is such an awesome color combination. This makes for a such an awesome little fall jacket and will be great as a blazer in the winter under a heavier jacket. I'm very excited about this and can't wait to sew one for my youngest as well.


You should go check out all the other awesome patterns over at the Seamingly Smitten Pattern Shop


Linking up to:

Saturday, October 27, 2012

Trick-or-Treat Totes

When my oldest was about 18 months old I decided to start sewing again after about 10 years off. I made her simple dresses and pillows then I decided that I wated to make her a bag for Trick-or-Treating that she could use year after year. I'm all about traditions. Last year I made my youngest one to go along with her adorable Elmo costume. I'm not sure if she'll still be wanting an Elmo bag in 10 years, but as for no she thinks it's pretty awesome!

 It's kind of nice to see similar projects side by side just 3 years apart to see how far your sewing has progressed through the years. I got my embroidery machine right before I made Maddie's bag and did the exact same emroidery on Abby's complete with their names.
 Maddie's bag is a little smaller and a little more limp because 4 years ago I had yet to discover interfacing. Also, Abby's bag is lined with fleece for 2 reasons. To hold the structure and because it was the only purple fabric I had on hand. ha!


Most holidays have traditions that go with them. Does your family have any halloween traditions?

Tuesday, October 23, 2012

Pumpkin Carving

The weather here lately has been unseasonably warm. This made it perfect to go out in the driveway and carve pumpkins. This is the first year we have actually carved pumpkins with the girls. In the past it has been decorating with markers and the cahracter kits that you can stick into the pumpkins. Now for the fun picture overload.
 

Abby trying to figure out if she wants to dig in or not.


My beautiful little girl. 

Abby watching while Daddy cuts my pumpkin open. It just wasn't working for me.


Abby showing me how it's done.


Maddie scared that Daddy is going to touch her with "the nasty stuff" lol


Maddie proving that she is brave with a couple of seeds in her hands. Can't you see the enjoyment on her face. haha


Look at this mom!!


My girls showing off their pumpkins. Maddie's was still yellow and solid so there was no scooping it out. Abby scooped hers out (with help) but opted for Buzz Lightyear in the end.

 I was the only one going for the 'traditional' pumpkin with a carved face and all. :)
 
HAPPY HALLOWEEN!

Monday, October 22, 2012

Pumpkin Picking

Saturday we went pumpkin picking at the local farm. This is the same place we go apple picking as well. With our schedule as busy as it is this was the only day we all had to get there. The problem is that it was raining the whole time we were there and super cold. The girls had a blast stomping through the mud. Good thing we brought along rain boots and towels.
 
 
 At least with all the mud it was easy to spot the bright orange pumpkins.
 
 
Maddie was excited to find one that looked like a strawberry.


And another that looked just like a watermelon.


My little Maddie lion excited about the rain.


Daddy and Abby found one they like.
 
Me and my girls. Cold and happy. :)
 

Friday, October 19, 2012

Narrow Rolled Hem Foot

While working on Halloween costumes I got a chance to pull out and finally try my narrow rolled hem foot. After a couple of runs on a test piece of fabric I can't imagine why I never used it before. I bought it a couple months ago and when it arrived I just got intimidated. Am I the only one who finds new sewing techniques intimidating?
 
This foot makes a 1/4" rolled hem without using an iron all. The costumes I am working on have a thick but silky material so ironing was almost impossible.

 
 See what a perfect hem it creates. All that is involved is popping off the normal stitch and popping the rolled hem one on. Girly pink with glitter, what's not to love (if you're 2)?


I was able to pick this one up on Amazon.com for about $10.00. What sewing feet have you tried lately?


Wednesday, October 17, 2012

WKWW - Thrifty Holiday Outfit

I love that WIWW has extended to WKWW for the kiddos. My clothes aren't interesting or stylish enough to share but I love styling my 2 favorite girls. With the holidays approaching I thought I would share a thrifty and cute outfit for my youngest Abby.
Shirt - Cherokee/HMD (big sis), Skirt - Children's Place/Good Will $.99, Red tights - Walmart $.75, Boots - HMS (cousin)
Simple and adorable. This is my kind of outfit. I especially love 1/2 off days at Good Will and HMD's (Hand Me Downs)

Linking up at:
WKWW

Thursday, October 11, 2012

Easiest Pumpkin Muffins Ever

I was wondering around Pinterest and I saw pins for pumpkin muffins and cakes that only required 2 ingredients. Sounds too good to be true right? Guess what, it's not. It's the same basic concept as the Pumpkin Brownies I posted about last month. 


Since the pumpkin brownies were missing a little something I thought I would add a third ingredient to the pumpkin muffins. All you need is:
 - Yellow cake mix
 - Small can of Pure Pumpkin Puree
 - 1 tsp Pumpkin Spice Mix
Take all three ingredients, dump them all in a bowl and mix. Hand mix, electric mix, doesn't matter. Whatever works for you. Dump it in a lined muffin tin (makes 12) and bake for 20-25 minutes at 350*.
Simple right?!?! Simple to make and delicious is a winning combination in my book.


Linking up at:

Tuesday, October 9, 2012

Whimsy Couture Apron - Pattern Review

 I recently had the opportunity to review a new apron pattern by Whimsy Couture. My daughter was so excited to pick out her fabrics. She used farm fabric left over from last year's teacher gift. What she and I both love the most about this apron is it's a do it yourself pattern.
 
 
The neck is elastic instead of ties and the apron velroes on the side instead of tying in the back. Maddie was so excited that she can grab it whenever she want to help me in the kitchen or bretend in hers without having to constantly ask for help. You know 5 year olds are a big deal and asking for help just isn't an option. :)


This pattern should be released soon and I think that it would make a great Christmas present. 

Friday, October 5, 2012

Candy Corn Pillowcase Dresses - Tutorial

I've been wanting to make pillowcase dresses for my girls for a while so a quick and easy Halloween dress seemed like the perfect opportunity. These were very easy to sew up and turned out cuter than I expected. We ran outside during the one unseasonably warm day we had this week to get pictures. Most likely they will be wearing this with a shirt underneath for the rest of the season. 


My girls like to come up with their own poses so here is my favorite. I was just happy that they weren't fighting.


The ribbon ties feed through the front and the back and tie on one side of the dress.

Peek-a-boo where's Abby? haha They were pretty proud of themselves for coming up with this pose.

Want to make one for the little lady in your life? Here's how.

I started by measuring the length of each girl from collar bone to knees then I added about 2 inches to cover all my seam allowances. If you are just doing one color this is a much simpler dress, but since I wanted my girls to look like giant pieces of candy we had to do some math.

I wanted the orange to be the longest, then yellow then white just like the candy. I used broadcloth to make mine which happens to come 22" across on the fold and that's the same width as a standard size pillow so I just cut straight across the full width of the fabric. This is what it should look like.


Start by sewing the 3 panels together with the right sides together. Make sure you keep them in the correct order. You will want to serge or zigzag stitch the seams so that it doesn't slowly unravel. You will want to serge/zigzag stitch along the top of the white panel as well. 
This is what the back will look like once it is serged together.


Once that was done I flipped it over and top stitched along the layers so the serged part would lay flat. This isn't necessary unless you have a kid like mine that hates the feeling of seems.


Next you will fold the fabric in half right sides together and sew (and serge) down the side seam to create a tube.
Reposition the dress so that the seam runs straight down the back of the dress.
Next you will fold the tube in half along the center seam to mark off the arm area.

For both dresses I started my line about 2 inches in and stopped about 1/4" before the orange seam. I just marked mine with pencil because this is the inside and will never be seen. Once the line is drawn, cut along the line through all the folded layers.


This is what it will look like once you unfold it. This way the arm cutouts will be completely symmetrical.

While the dress is still inside out fold over the white edge about an inch (or as much as you need to create a casing for your ribbon) and sew as close the the serged/finished edge as possible. You will want to do this on both the front and back.
Now take your ribbon and attach a safety pin to one end. With the dress turned right side out you will feed the ribbon through the front and them through the back leaving both ends of the ribbon hanging out of the same side of the dress. You will need to heat seal of add fray check to the ends of the ribbon to prevent fraying.


Once I had my dress assembled I tried it on and realized that it was a little shorter than I would have liked so I decided to add a ruffle to the bottom to add extra length. In the end I like it ruffled better so we can pretend that was my plan all along or you can finish the bottom of the orange panel and call it a day.

If you want the ruffle, here's how. You can easily ruffle without a ruffle foot by setting your machine to the highest tension and the longest stitch them running your fabric through. For the ruffle measurement you will want to measure your dress across and multiply that by 4. Since mine is 22" across my fabric was 88" long and 7" wide. I folded it in half before I ruffled it. It may require you to sew a couple lengths together to get the full amount.

Once you have it ruffled pin it to the bottom of the dress right sides together and sew all the way around. I serged the edge to finish it and top stitched along the ruffle so it would lay down. Sorry I forgot to take pictures of this part.


Now your little one will be all set to run and play looking as "sweet" as can be. If you make one up for your little lady I'd love for you to stop by and leave the link. Hope you find this tutorial helpful. :)


Linking this up at:

Bowdabra Blog